Android 消息处理机制学习
之前也看过不少的书或博客介绍Android 消息处理机制的知识点,但总是刚看完感觉懂了,过几天就忘,今天一边看源码,一边画了类图和时序图,希望可以加深自己的理解。
Android应用启动时会创建一个主线程,与Android UI工具包交互,因此也叫UI线程,因此不能被一些耗时长的操作阻塞,阻塞时通常的表现是UI控件的事件不能得到响应,比如按钮按下去了弹不回来,长时间还会造成ANR,Android提供的消息处理机制就是来解决这个问题的,其中涉及的主要的类是Handler、Looper和MessageQueue。其类图如下,简单起见只列出了一些主要的方法。
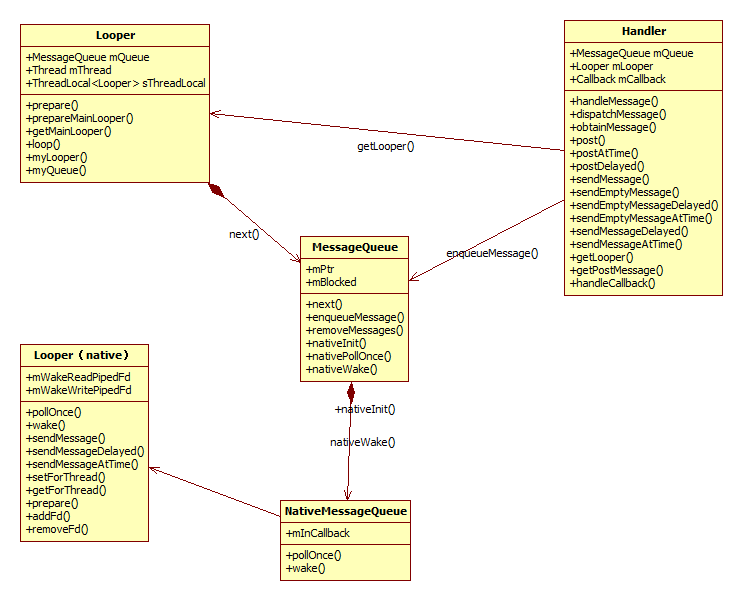

其中MessageQueue为消息队列,Looper负责创建并管理消息队列,使其进入一个循环,Handler负责发送消息以及处理消息。发送消息一般在耗时操作执行完后在工作线程进行,处理消息一般在主线程进行。以下为Android消息处理机制的时序图:
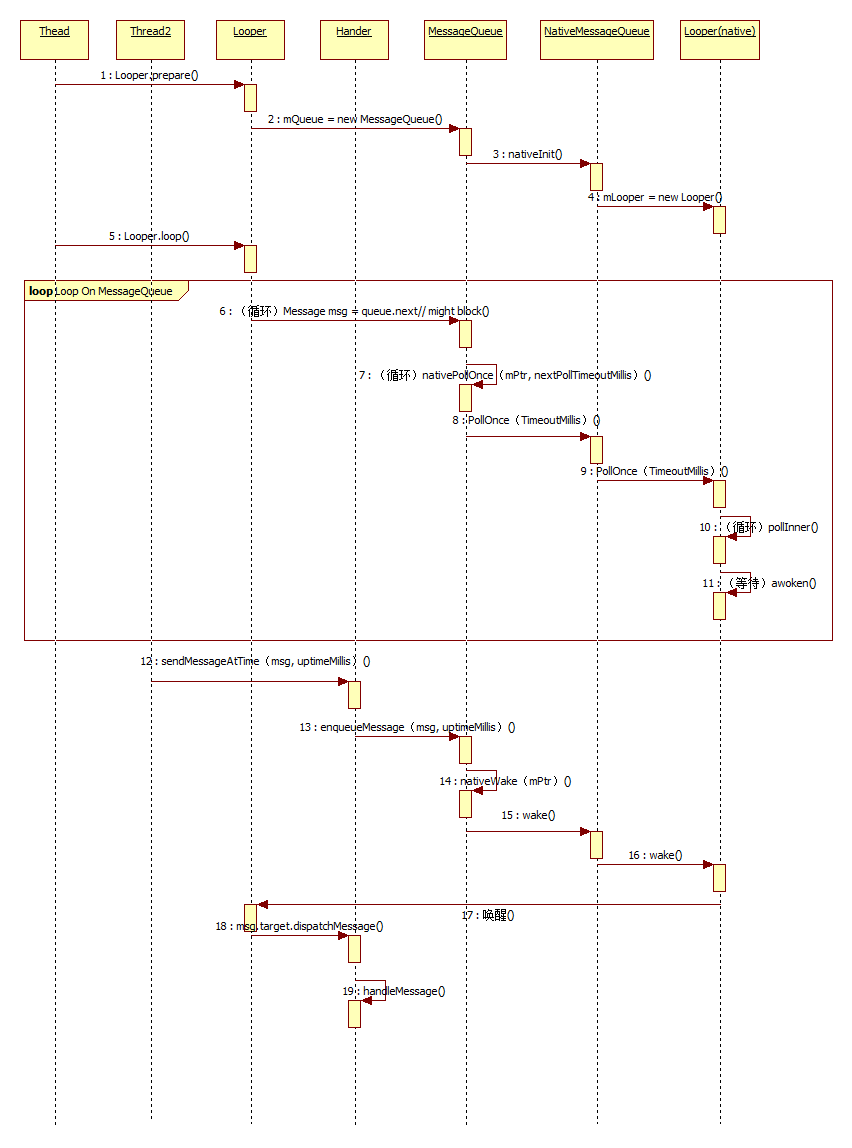
时序图中1-4步是消息队列的创建过程。
5-11步为线程进入一个循环,并监听是否有消息要处理,如果没有消息,线程就会进入睡眠等待状态。
12-16步为消息发送过程。
17-19步为消息的处理过程。
以上就是android异步消息处理的整个过程。下面结合具体应用进一步分析。
下面是一段最简单的应用代码。
package blogxuan.bloghandler;
import android.app.Activity;
import android.app.ProgressDialog;
import android.os.Bundle;
import android.os.Handler;
import android.os.Message;
import android.view.View;
import android.widget.Button;

public class MainActivity extends Activity
{
	ProgressDialog progressDialog;
	Handler handler = new Handler()
	{
		@Override
		public void handleMessage(Message msg) {
			if (msg.what == 0) {
				progressDialog.cancel();
			}
		}
	};

	@Override
	protected void onCreate(Bundle savedInstanceState)
	{
		super.onCreate(savedInstanceState);
		setContentView(R.layout.activity_main);
		Button startBtn = (Button) findViewById(R.id.button);
		progressDialog = new ProgressDialog(MainActivity.this);
		startBtn.setOnClickListener(new View.OnClickListener() {
			@Override
			public void onClick(View view) {
				progressDialog.show();
				new Thread(new Runnable() {
					@Override
					public void run() {
                        try {
                            Thread.sleep(3000);
                        } catch (InterruptedException e) {
                            e.printStackTrace();
                        }
                        handler.sendEmptyMessage(0);
					}
				}).start();
			}
		});
	}
}
点击按钮后主界面会显示一个进度对话框,然后会新建一个线程,Thread的sleep方法模拟一个耗时操作,执行完后handler发送消息,然后在主线程中handler的handleMessage方法收到消息后关闭进度对话框。代码中可以看出只有流程图中的消息发送过程以及消息处理过程,并没看到1-11步消息队列的创建过程以及循环过程。这是因为UI线程默认会给我们进行这两个过程。在Acitvity的源码中可以找到一个叫mMainThread的ActivityThread类变量,而Looper和MessageQueue的创建就是在ActivityThread这个类的main方法中进行的,如下所示:
public static void main(String[] args) {
    SamplingProfilerIntegration.start();

    // CloseGuard defaults to true and can be quite spammy.  We
    // disable it here, but selectively enable it later (via
    // StrictMode) on debug builds, but using DropBox, not logs.
    CloseGuard.setEnabled(false);

    Process.setArgV0("<pre-initialized>");

    Looper.prepareMainLooper();
    if (sMainThreadHandler == null) {
        sMainThreadHandler = new Handler();
    }

    ActivityThread thread = new ActivityThread();
    thread.attach(false);

    if (false) {
        Looper.myLooper().setMessageLogging(new
                LogPrinter(Log.DEBUG, "ActivityThread"));
    }

    Looper.loop();

    throw new RuntimeException("Main thread loop unexpectedly exited");
}
虽然没有时序图中的Looper.prepare()方法,但其实Looper.prepareMainLooper()这个方法也会间接调用prepare()方法。一旦调用prepare()方法,便会完成Looper对象以及MessageQueue对象的创建,同时完成C++层的NativeMessageQueue和Looper的绑定,不在深入。
调用Looper.prepare()只是创建消息队列的过程,调用Looper.loop()方法才能使消息队列进入一个循环过程并对消息进行监听。
UI线程创建的时候自动建立了消息队列并进入循环过程,这样我们就可以在完成工作线程的耗时操作后往UI线程的消息队列发消息提示更新UI组件。
但是如果我们希望一个相反的过程,也就是工作线程需要等待UI线程完成一些操作后再做一些操作,那么我们必须自己在工作线程中实现Looper和MessageQueue的创建以及循环。
class LooperThread extends Thread {
    public Handler mHandler;

    public void run() {
        Looper.prepare();

        mHandler = new Handler() {
            public void handleMessage(Message msg) {
                // process incoming messages here
            }
        };

        Looper.loop();
    }
}
以上是Looper源代码中的参考用例。这种用法自己暂时只用到过一次,当时项目中有个需求是实现异步数据库事务。当时开了一个子线程来调用了数据库的beginTransaction()方法,当又开了另一个线程进行数据库操作的时候发现报数据库被锁了,后来查资料发现一个完整的数据库事务必须放在一个线程执行才行,但是根据项目的需求执行数据库的操作是在UI线程发起的,因此就只能在开启事务的子线程中实现Looper和MessageQueue(线程默认是没有Looper和MessageQueue的),这样就实现了子线程也能进行消息循环监听,当UI线程需要执行数据库操作时再向子线程发送消息通知在子线程中继续进行数据库操作,就能保证数据库的操作跟开启事务是同一个子线程。
Looper对象的创建还有一个概念是ThreadLocal,Looper.prepare()方法完成了Looper对象的创建,其源码如下:
public static void prepare() {
    if (sThreadLocal.get() != null) {
        throw new RuntimeException("Only one Looper may be created per thread");
    }
    sThreadLocal.set(new Looper());
}
从代码中看到Looper对象创建并不像我们通常的方式new一个静态全局变量,或者是通过单例模式的方式创建,而是通过ThreadLocal对象来把这个Looper对象包含起来,ThreadLocal的源码的注释说明如下:
/**
 * Implements a thread-local storage, that is, a variable for which each thread
 * has its own value. All threads share the same {@code ThreadLocal} object,
 * but each sees a different value when accessing it, and changes made by one
 * thread do not affect the other threads. The implementation supports
 * {@code null} values.
 *
 * @see java.lang.Thread
 * @author Bob Lee
 */
简单来讲就是可以实现同一个ThreadLocal对象,在不同的线程中有不同的值,并且不同线程之间的值互不干扰,为什么需要这个东西呢,假设有两个线程都需要实现looper机制,这两个线程的Looper和MessageQueue肯定是不一样的,而且一个线程只能有一个Looper和MessageQueue,这点从上面Looper.prepare()的源码看出,当在两个线程各创建了一个Handler时,怎么保证这两个handler发的消息不会发到别的线程的消息队列中呢?这就需要handler跟各自线程的Looper和MessageQueue绑定起来,而怎么绑定呢? 下面是Handler创建的构造函数的代码:
public Handler() {
   ...
    mLooper = Looper.myLooper();
    if (mLooper == null) {
        throw new RuntimeException(
            "Can't create handler inside thread that has not called Looper.prepare()");
    }
    mQueue = mLooper.mQueue;
    mCallback = null;
}
从代码可以看出是通过Looper.myLooper();方法来进行关联的,Looper.myLooper()的代码如下:
public static Looper myLooper() {
    return sThreadLocal.get();
}
简单的一行代码就实现了绑定,而如果我们不用ThreadLocal,那么就必须提供一个全局的哈希表给Handler来查找关联的线程的Looper了,这就是ThreadLocal的好处,至于ThreadLocal为什么能实现这种效果,下面是ThreadLocal的set方法代码:
public void set(T value) {
    Thread currentThread = Thread.currentThread();
    Values values = values(currentThread);
    if (values == null) {
        values = initializeValues(currentThread);
    }
    values.put(this, value);
}
从这个方法大致可以看出set进去的value值(Looper)和Thread对象以及this(ThreadLocal)对象关联了,而不同线程的values是不一样的,所以当调用get方法取出Looper时就可以根据不同的线程对象取出不同的值了,就不往下分析了。 以上是Looper和MessageQueue的创建以及循环过程,下面分析下消息的发送过程和处理过程。
消息的发送过程通常是用handler的sendMessage方法,通过上面handler的类图可以发现还有好多类似的方法,但最终都会走导sendMessageAtTime方法,因此时序图中写的是这个方法,源码如下:
public boolean sendMessageAtTime(Message msg, long uptimeMillis)
{
    boolean sent = false;
    MessageQueue queue = mQueue;
    if (queue != null) {
        msg.target = this;
        sent = queue.enqueueMessage(msg, uptimeMillis);
    }
    else {
       ...
    }
    return sent;
}
发送消息过程其实就是消息入队过程,之后便会唤醒阻塞的queue.next()方法。这个方法是在Looper.loop()方法中调用的,代码如下:
 public static void loop() {
    Looper me = myLooper();
    if (me == null) {
        throw new RuntimeException("No Looper; Looper.prepare() wasn't called on this thread.");
    }
    MessageQueue queue = me.mQueue;
    ...
    while (true) {
        Message msg = queue.next(); // might block
        if (msg != null) {
            if (msg.target == null) {
                // No target is a magic identifier for the quit message.
                return;
            }
		   ...
            msg.target.dispatchMessage(msg);
           ...
        }
    }
}
唤醒queue.next()后就会进入消息处理过程,也就是msg.target.dispatchMessage(msg),而msg.target其实就是handler对象,从sendMessageAtTime的源码中就可以看出来,handler.dispatchMessage的代码如下:
public void dispatchMessage(Message msg) {
    if (msg.callback != null) {
        handleCallback(msg);
    } else {
        if (mCallback != null) {
            if (mCallback.handleMessage(msg)) {
                return;
            }
        }
        handleMessage(msg);
    }
}
第十行的代码就会调用到在new Handler时重写的方法。这里还有必要说下第三行的handleCallback(msg)方法:
在公司的项目中经常看到一个这样的用法:
handler.post(new Runnable() {
    @Override
        public void run() {
        	progressDialog.cancel();
        }
});
handler在创建的时候并没重写handleMessage方法,为什么可以这样在run方法中进行ui操作呢?查看handler的post源码:
public final boolean post(Runnable r)
{
   return  sendMessageDelayed(getPostMessage(r), 0);
}
而sendMessageDelayed方法其实最终也会调用到上面讲过的sendMessageAtTime方法,getPostMessage的代码如下:
private final Message getPostMessage(Runnable r) {
    Message m = Message.obtain();
    m.callback = r;
    return m;
}
可以看到getPostMessage构造了一个消息对象,对象的callback对象就是post方法中进行UI操作的的Runable对象,从上面dispatchMessage中源码的第三行查看handleCallback代码如下:
private final void handleCallback(Message message) {
    message.callback.run();
}
正是在这里执行了run方法的操作,因为直接调用Runable的run方法并不会创建一个线程,因此如果handler关联的是UI线程,在handler.post方法中进行UI操作是没问题的,同理不能在这里执行耗时操作。
以上就是自己对于Android消息处理机制的理解,第一次认真写一篇博客,花费了快一天的时间,希望能坚持下去。